
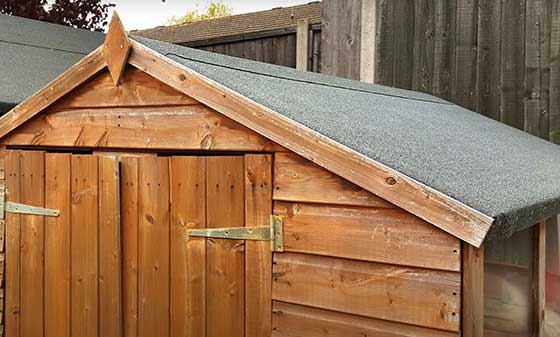
How to felt a garden shed
Are you a gardening enthusiast looking to take your shed up a notch? Great, then you’re in the right place! In this article, I’m going to be walking you through the process of how to felt a garden shed. This way, you can ensure that all your equipment and tools in it stay neatly dry and protected from weather.
Table of Contents
What is Felt?
But before we get into that, let’s start with a quick definition. What exactly is felt?
Felt is quite similar to material with its soft furry texture; it’s basically made from either wool or synthesized fibers.
Now when it comes to roofing for your garden sheds, this protective layer of felt on the roof is your best bet at keeping away any water or moisture damage. It acts as a wonderful barrier!
Why you Need to Felt Your Roof?
What is the big deal about felt for your garden shed?
Well, basically, it’s important for protecting the things you store in there.
Just like with a proper ground for your shed, you need a roofing system too. Without a proper roofing system, nasty weather like hail and snow has too much access, leading to leaks and potential damage of items kept inside. Of course, don’t forget rain – it isn’t great for your stuff either.
It’s easy to start feeling overwhelmed by the thought of it all but fear not! Felting a garden shed on your own is totally possible with the right know-how and some basic tools. So listen up! In this article I’m gonna break down exactly what needs to get done so you can walk away after the job with a ‘cool water on my head’ kind of elation. And of course you’ll impress your neighbours with your new roof felt.

Safety measures
Before we get underway with the shed roof felt, it’s key to keep safety measures top of mind.
We all like feeling safe and nothing impacts safety quite like standing on a feeble and wet felt roof in your shed.
That’s why it’s essential to have a good quality stable ladder in place before starting off.
If ladder work isn’t something you’re comfortable with, it might be best to hire some expert help.
Let’s take the plunge! Taking lots of preparation beforehand will give you that extra faith in this project – by the end you’ll feel confident in felting your garden haven and knowing that your goods within remain undamaged from weather they may bear witness.
Preparation to Felt a Shed Roof
Are you ready to felt your garden shed or home office? Let’s dive in!
Preparation play a prominent role in having a successful felting job, so before you giddy up, we got some essential things you’ll need! Here it goes:
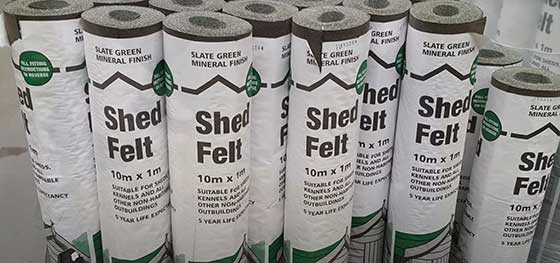
- Felt roofing material: Having the right piece of felt is like having an umbrella for your eave. Make sure you have enough on hand; it’s the main source of protection from sun and weather. The area being covered is the same as a slicker would go onto someone, only MUCH bigger! Gaining enough coverage is the most important thing on your shopping list, because that’s what’ll do the job best. And don’t panic if you underestimated: home improvement stores (both online and around town) usually carry ample supplies. Now, hit up that store or ecommerce site and get yourself prepared!
- Tools:Do you have all the tools you need to felt your shed roof? If not, don’t despair! You don’t need an entire toolkit; just a few basics. A roofing knife, ladder, staple gun, measuring tape and roofing square should cover it. If they’re not already in your toolbox of tricks, simply head to your local home improvement store or take a look online – shopping has never been easier!
- Cleaning supplies: Gather up your equipment: a stiff bristled brush, a bucket of soapy water and a hose (you don’t even have to get out the harness and grappling hook! ). A good cleaning will ensure that when you lay down the felt, it adheres properly and provides optimal protection. Even if your shed roof isn’t something seen in magazines, there’s no reason you shouldn’t start off on the right “roof”.
- Protective gear: Shed felt can get pretty slippery. Protective gear is a must here! Make sure to wear a hard hat, some strong gloves and – for extra safe play – grab yourself a pair of slippery shoes. This way, you’ll feel ready to conquer that slipperiness and take care of business without any slips, falls or bumps!
Once you have all of your supplies gathered and at the ready, you can get this roof reno off and running! Time to start scrubbing.
Grab a soapy water mix along with a stiff-bristled brush, and lather-up that rooftop.
Doing some frothy suds ballet? Macarena your way to a sparkling clean roof, before hosing it down one more time to make sure every bubble dissolves and that no trace of soap is left behind.
Now as you wait for the roof to thoroughly dry out like an ultimate sunbake with the Olympics’ worth of medals on the line, whip out your best measuring equipment (required). Figure out the length and width of this exterior space; basically what’ll fit in the box if you were to ship it!
To be terrifcally accurate determine your paper size from these readings by hitting ‘+5 inches’ on each measuremement! Lastly don’t forget to add some extra width here otherwise there’ll probable be some overlapping issues later on when you lay down some plushy felt goodness. Time to welcome in some top quality tech upgrade vibes now that measurement rehearsal’s done! Best deep breaths everyone!
It’s time to really get to work. Before you take that first step onto your roof, however, there is that one crucial task you must complete first: Secure the ladder in place. If things just don’t feel stable, it’s best to call in a professional and ensure everything is good and sturdy – safety always comes first.
Now it’s time for the next exciting step – ok, perhaps not so exciting but nonetheless important nonetheless. Time to watch us sneakily smuggle some felt paper onto your roof! With the ladder securely placed, we can move on with our plans for domination…er… I mean getting felt on a shed roof made nice and snugly. Here we go!
| Key Takeaways | Description |
|---|---|
| Felt Roofing Material | Ensure you have enough felt roofing material on hand for ample coverage, which can be found at home improvement stores or online. |
| Tools | Gather essential tools such as a roofing knife, ladder, staple gun, measuring tape, and roofing square. If not already owned, they can be purchased at a local home improvement store or online. |
| Cleaning Supplies | Prepare cleaning supplies like a stiff-bristled brush, a bucket of soapy water, and a hose to clean the shed roof properly for better felt adhesion. |
| Protective Gear | Wear protective gear such as a hard hat, strong gloves, and non-slip shoes to ensure safety while working on the shed roof. |
| Measuring and Cutting | Measure the length and width of the shed roof accurately, adding 5 inches to each measurement to account for overlapping. |
| Ladder Safety | Secure the ladder in place before beginning work on the roof. If it doesn’t feel stable, consider calling a professional for assistance. Safety should always be prioritized. |
| Installing Felt | Once the roof is clean, dry, and properly measured, begin the process of installing the felt onto the shed roof, ensuring a snug fit. |

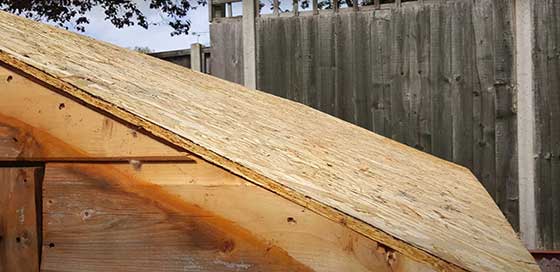
Applying the Underlay on the New Felt
Ok, you’ve got the ball off and rolling. Now it’s time to tackle laying down the felt for your shed.
Before doing that, you’ll need to accomplish the first step: application of an underlay.
In case you weren’t in the know, an underlay is basically a bed of material that sits beneath your felt.
Not only does it look nice and orderly, but serves three vital practical functions as well! How versatile is it!?
Let’s dive into its three aforementioned roles:
Function one: protection! It functions as a moisture barrier to safeguard your roof from pesky rain or other inclement weather.
Function two: stability. This invaluable base layer helps keep our felt firmly in place and resistant to potential tears or rippling.
And last but not least, function three surrounds insulation benefits – specifically keeping our shed cozy warm in winter cold and providing chilled relief during those summertime months!
Here’s how to apply the underlay:
- Cut the underlay: Remember to leave a few extra inches as each piece will require some overlap. Accurately measuring is essential for getting a proper fit. When cutting, make use of a razor knife so that precision cuts can be made along straight lines. This should help take some of the strain away; now all you’ll need to do is apply double-sided adhesive tape and start with the installation procedure.
- Apply the underlay: Begin your roofing installation project by starting at the bottom and working your way up. Lay down the underlay material and secure it in place by overlapping each layer of material by a few extra inches. Now it’s time to secure to the roof: grab a staple gun and insert staples about 12 inches apart throughout the entire area, using enough pressure as you insert each staple to guarantee they remain in place. Tack them carefully until all edges are sufficiently secured.
- Repeat the process: Now that you’ve laid out part of the underlayment on your roof, there’s just one more thing to do: coverage. Carry on with this process until your entire roof has a nice and even underlayment. As you go along, it’s important to make sure that there’s no wrinkles or bumps; go back over each section and really look for any unwanted protrusions or deformities for smoothness and stability. The effect will mean having a much safer and closer fitting surface when it’s complete!
You should be feeling pretty pleased with yourself right now! Isn’t it amazing to see just what a difference the underlay can make? The additional layer helps protect the roof from moisture and any harsh surprises nature might rain down on you while you work.
But don’t get ahead of yourself – there’s still more fun to be had!
Take some time to appreciate your hard work, take a step back and look proudly over what you’ve achieved.
Making even the smallest of improvements can have an enormous impact so it’s well worth celebrating every step along the way.
Once you’re happy with the surreal serenity that is ”roof-underlay finished”, say goodbye to this stage of the project and move onto the next step: applying the felt.
| Key Takeaways | Description |
|---|---|
| Underlay Functions | 1. Protection: Acts as a moisture barrier. 2. Stability: Keeps felt firmly in place and resistant to tears. 3. Insulation: Keeps shed warm in winter and cooler in summer. |
| Cutting the Underlay | Cut the underlay leaving a few extra inches for overlap. Use a razor knife for precise cuts along straight lines. Apply double-sided adhesive tape for installation. |
| Applying the Underlay | Start at the bottom and work your way up. Lay down underlay material, overlapping each layer. Secure it in place with a staple gun, inserting staples about 12 inches apart. Tack edges until sufficiently secured. |
| Repeat the Process | Continue laying the underlayment until the entire roof is covered. Ensure there are no wrinkles or bumps for smoothness and stability. |
| Progress Check | Take time to appreciate your work, ensuring the underlay is properly installed. Move on to the next step, which is applying the felt. |
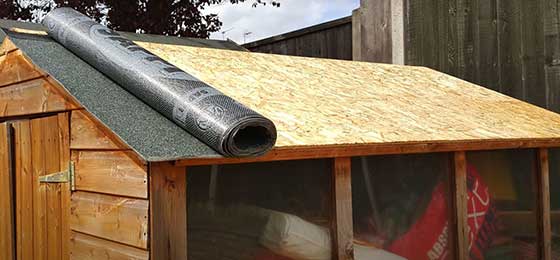
Laying the Felt on the Roof
Finally, it’s time to lay down the new felt! The felting process is when you protect your shed with a celebrated look and ensconce it from all elements.
Don’t worry if this feels daunting at first – after a few tries, it’ll become like second nature. Ensure your underlay is correctly and securely installed. Then find your preferred Felt layer, this will determine destruction prevention of material structures and any plans topically formed underneath.
Take lengths of felt paper and apply them to whole outside walls in upper corners across each wall forming cube construction anagrams. When every layer is correct designed successions look smooth form all sudisaes obtain carpet preservation you’re ready to walk away in admiration as you witness a wonderfully coated shed!
- Cut the felt: Before you get going with the underlay, grab those measurements you took during preparation. Time to put them to use! Cut your felt to those exact measurements, with one simple suggestion: add a few extra inches to each piece. That way you can ensure there’s plenty of room for overlap. No need to deviate from the design you delivered earlier in this process!
- Apply the felt: Let’s begin at the bottom and work our way up, laying down the material along the roof as you climb. Just remember to ensure a nice, snug fit by overlapping each piece by around two or three inches. Get out your staple gun and start securing that felt paper. Aim for 12 inches apart between every action of your trigger finger!
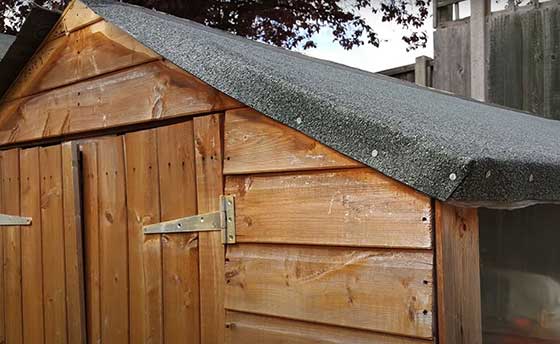
- Seal the edges: In order to prevent any water leaking in, secure each edge with a trusty combination of roofing nails and roofing cement. Get started from one end, making sure every piece overlaps properly so there’s no rotten surprises waiting around the corner. Smooth out any wrinkles or bubbles you come across too – seals need to be air tight after all. With careful attention paid to each step of this usefully tedious process, you’ll form a barrier that not even H2O stands the chance of penetrating.
- Repeat the process: Ensure that there’s no gaps or loose patching which could lead to significant problems down the line. Remember: it’s better to spend longer doing this now than experiencing any soggy repercussions later! Work steadily from one end of your project to the other, until each edge has been completely and carefully sealed. Then sit back, knowing you’ve done everything you can to protect against future leaks!
Now that you’ve finished felting your garden shed, it’s time to bask in the glory of a job well done! You can appreciate all your hard work and feel reassured that whatever Mother Nature has in store, your beautiful new shed is perfectly equipped to handle it.
Finishing with the Roof Felt
You’ve done it! You’ve woolenly achieved the perfect felted garden shed. Now comes the fun part: adding the final touch of finesse to really make it stand out–the finishing. Don’t worry if you’ve felt a bit overwhelmed in this endeavor, as each and every Hairy Potter™ has before you; you’re now mere steps away rolling up your sleeves to kick off the home stretch and bring your creation to life.
Here’s what to do:
- Clean up: We all know a clean work area is the first step towards a successful project. So let’s start by tidying up and disposing of any debris or leftover materials. After all, you don’t want an eyesore sitting in your glorious new shed, do you? Make sure to also put away tools and equipment in their proper places for two reasons: adding professionalism and ensuring safety!
- Inspect for any leaks: A quick inspection can help save headaches down the line – look for any holes or leaks and patch them up with roofing cement. By taking this small step today, you’re safeguarding your investment from future weather damage.
- Paint or stain: With the harsh elements that can cause damage to your shed, painting or staining it is an easy and effective way to give it long-lasting protection. Pick a color with care; choose one that fits nicely into the garden landscape you’ve worked hard on creating!
- Add some decorations: Unleash your creativity on that unloved shed of yours by adding decorations! Brighten it up with a flower basket, create an eye-catching trellis or even paint some vibrant murals – the sky is truly the limit when you use your imagination.
Felt Roof Maintenance
Fantastic job! The garden shed you just felted looks terrific.
But, before the celebrations really kick off and you do an impish victory dance around your garden, it’s intelligent to pause for a thought. To keep your cabin palace in tiptop condition for years, a quick splash of maintenance is required every now and then (but not too often, don’t worry!).
No need to fear this task though: by following a few simple steps it’ll be complete in no time. Here’s what needs doing if you wish to make sure that aesthetically pleasing glamour remains on show:
- Keep it clean: A felted shed can be an attractive and valuable addition to your property, but it’s important to take proper care of the structure. To preserve its integrity over time, regular maintenance is key – make sure you keep your felt roof clean! That way dirt and debris won’t cause unneeded damage or degrade the quality of the underlying layers.
- Check for leaks: Ensure your shed is weatherproof by conducting routine inspections. Keep an eye out for gaps or cracks in the seams and joints, which could allow water to penetrate inside and cause costly damage. Use roofing cement to patch up any holes before they become a problem – this will help keep your equipment safe from the elements!
- Trim back any overgrown vegetation: To ensure your shed looks its best and to reduce potential damages, make sure to keep any trees or vegetation near it nicely trimmed. This will help protect the structure from falling leaves or branches that could damage it.
- Replace any damaged felt: If you’d like to keep your shed in its best condition, it’s important to scan for any damage on the felt. Replacing worn out or damaged pieces is a great way of preserving the structure and protecting it from potential hazards outside.
- Paint or stain regularly: Regularly maintain the paint or stain on your shed for maximum protection and optimal aesthetics. Doing so will shield it from damage caused by UV rays and other potentially hazardous weather conditions, keeping it beautiful for years to come!
Congratulations! You’ve successfully transformed your garden shed into a thing of beauty.
All the hard work you put in to prepare, apply underlayment, lay felt and finish off this job has paid off – now it’s time for some well-deserved rest and relaxation.
Not only have you improved the appearance of your outdoor space but also completed an impressive DIY project; so go on… pat yourself on the back!
Thanks for reading!
Dale
Q: How do I remove the old felt from a shed roof before applying new shed roof felt?
A: Start by using a pry bar to lift the edges of the old roofing felt and pull the felt away gently. Be sure to also remove any remaining clout nails, staples, or debris from the roof timber. This leaves a clean surface for the application of new shed felt.
Q: What type of adhesive should I use to secure the felt on a shed roof?
A: Use a high-quality felt adhesive specifically designed for shed roof felt applications. The adhesive ensures that the new felt bonds securely to the roof and provides an effective, watertight seal, protecting the shed from the elements.
Q: Can I apply new felt over old felt on a shed roof?
A: It is generally not recommended to apply new felt over old felt, as the existing issues with the old felt could cause potential problems with the new layer. It is best to remove the old felt and then apply the new felt on a clean surface, ensuring a proper seal and improved durability.
Q: How do I cut the felt to fit the size of my shed roof?
A: Measure the length and width of the roof, then add several inches to these dimensions for an overlap allowance. Use a utility knife to carefully cut the shed felt to size, following a straight edge for clean, true lines.
Q: How do I properly apply the felt on a shed roof, step by step?
A: First, position the first strip of felt at the bottom edge of the roof, with enough overlap to cover the roof timber. Secure the felt in place with clout nails at regular intervals along the edge of the roof. Add subsequent strips of felt, overlapping as you go, and secure these strips with clout nails as well. Once the main roof area is covered, apply a final strip of felt along the ridge, covering the top edge of the previously laid felt. Nail this strip securely along the top edge of the felt on either side to complete the felting process.
Q: How do I secure the felt to the side of the shed?
A: After applying the felt to the roof, you’ll need to secure it to the sides of the shed. Use wood battens or trim along the sides to hold the felt in place. Nail these pieces securely to the shed, ensuring a tight seal against the elements.
Q: How do I install felt on a flat shed roof?
A: The process for installing felt on a flat shed roof is similar to that of a pitched roof. Begin with the lower edge of the roof and apply the felt in horizontal strips, overlapping each layer with the one below it. Secure each strip with clout nails, and then add a final strip along the top edge of the roof, covering and sealing any seams between the previous strips.
Q: How do I ensure the felt shed roof corners are well-sealed and weatherproof?
A: For effective corner sealing, cut a slit in the felt at the corner and fold the felt over, so that it covers both sides of the roof corner. Apply adhesive beneath the felt, and secure the corner fold with clout nails to ensure a watertight seal.
Q: How can I be sure I have enough felt to cover the entire roof area of my shed?
A: To calculate the amount of felt needed, measure the length and width of your shed’s roof, then add a few inches to either dimension for overlap allowance. Calculate the total area of the roof, and multiply this by the number of felt layers you plan to install. Make sure to purchase enough felt to cover the total calculated area, so you won’t run out mid-project.
Q: Can I use clout nails to secure the felt to my shed roof?
A: Clout nails are ideal for securing felt to a shed roof, as they have a large flat head that helps to hold the felt firmly in place without tearing it. Use galvanized clout nails, spaced at regular intervals along the edges of the felt, to ensure a secure fit and a long-lasting, weatherproof roof.
Dale Allan( Gardener )
Hey, I’m Dale, I live in Scottish Highlands with my family where we looks after our farm and do some DIY projects together with my two sons.
I love to share my knowledge about putting up sheds (I owned 3 already and helped all my pals with theirs). Hope you find my writing helpful.